
Your first behavior tree
Bind one node to a method on your own component and watch an object cross your scene because a graph decided it should.
On this page
One node, one method you already wrote, and an object in your scene starts moving because a graph said so. Give it twenty minutes and you will have the whole loop in your hands.
The thing this replaces
Section titled “The thing this replaces”The Platformer enemy walks a three point route and turns at each end. Written by hand, that decision starts as a bool for “am I walking”, gains a second bool for the turn, and picks up a coroutine somebody meant to remove. The movement code was never the problem. The problem is the flag that three other scripts now read.
A behavior tree takes that decision out of the component and puts it on a canvas, and leaves the component doing exactly what it did before.
When you would reach for this
Section titled “When you would reach for this”- An actor needs to keep doing something until its own code says it is finished, like walking to a point.
- You want the order of attempts visible, so a designer can reorder them without a recompile.
- You have a method that already works when game code calls it, and you want something else deciding when to call it.
The Platformer sample does this with EnemyPatrol.bqbehavior, which is a Repeat around a Sequence around exactly two nodes.
The component the graph will call
Section titled “The component the graph will call”Start with a public method whose visible effect already works. For a scene with no suitable actor yet, add this ordinary MonoBehaviour. It moves its own GameObject and reports whether it needs another update.
using UnityEngine;
public sealed class GuardMotor : MonoBehaviour{    [SerializeField] private Transform destination;    [SerializeField] private Renderer indicator;    [SerializeField] private float stopDistance = 0.05f;
    public bool Advance(float speed)    {        if (destination == null)        {            return false;        }
        transform.position = Vector3.MoveTowards(            transform.position,            destination.position,            speed * Time.deltaTime);
        return Vector3.Distance(transform.position, destination.position) > stopDistance;    }
    public void ShowArrived()    {        if (indicator != null)        {            indicator.material.color = Color.green;        }    }}
Create a Cube named Guard and add GuardMotor to it. Create an empty GameObject named Destination a few units away, give it a small Sphere child named Destination Marker raised above the parent so you can see where the trip ends, and assign Destination to the component’s Destination field. Assign the Cube’s Mesh Renderer to Indicator. ShowArrived is used by the next tutorial.
Using your own component instead? Write down its exact signature before step 6, and what its return value means before step 8. The steps below read true as “call me again” and false as “I am finished”.
Build the tree
Section titled “Build the tree”-
In the Project window choose Assets > Create > Behavior & State > Behavior Tree and name the graph
GuardAdvance. -
Double-click
GuardAdvance.bqbehavior. The Behavior Tree Editor opens, or you can open it yourself from Window > Behavior & State > Behavior Tree Editor. Leave the toolbar on Static. -
The canvas is empty and offers one control, add root behavior. Click it.
-
The insertion picker opens with the heading ADD THE ROOT BEHAVIOR. Choose method under ACTIONS, described as “invoke a c# method on a target”. One call is a complete root for this exercise.
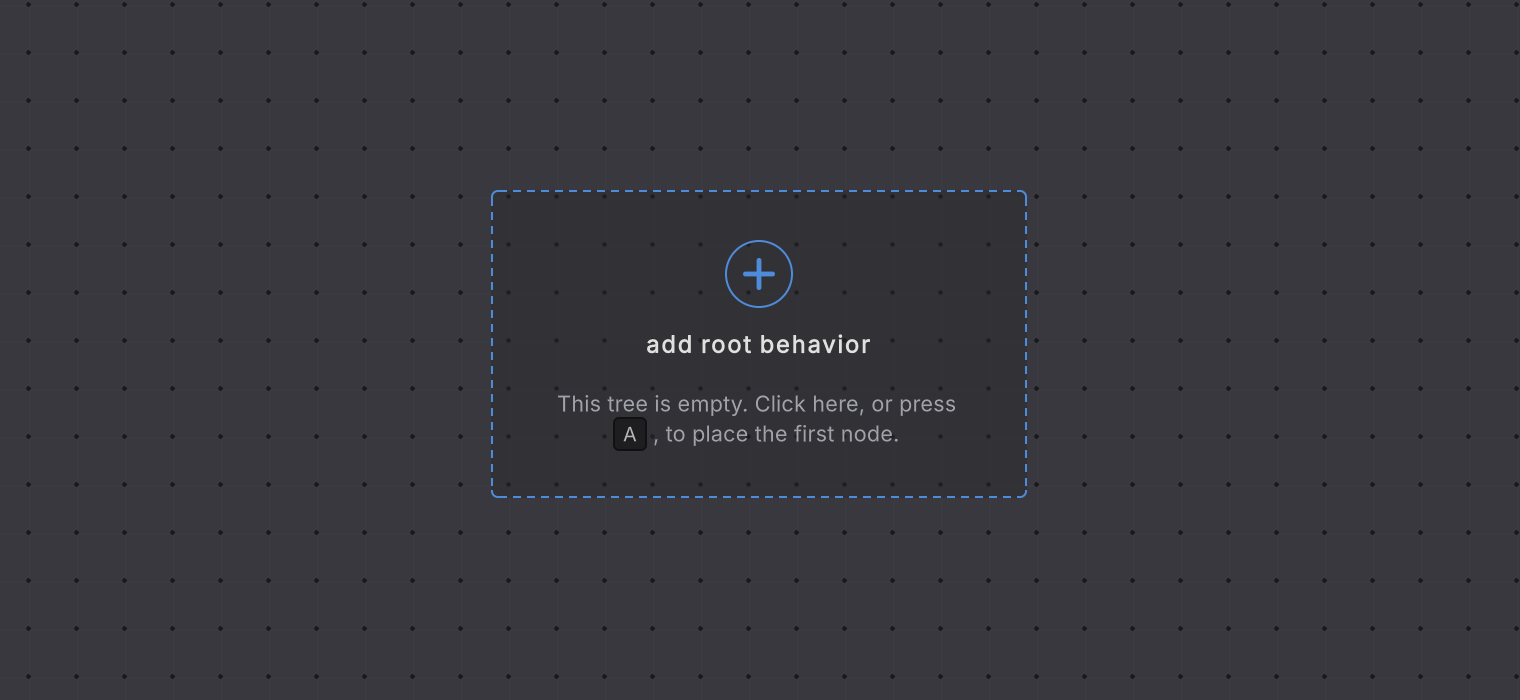
GuardAdvance canvas. One control, and the hint names a shortcut this release leaves unbound, so click it.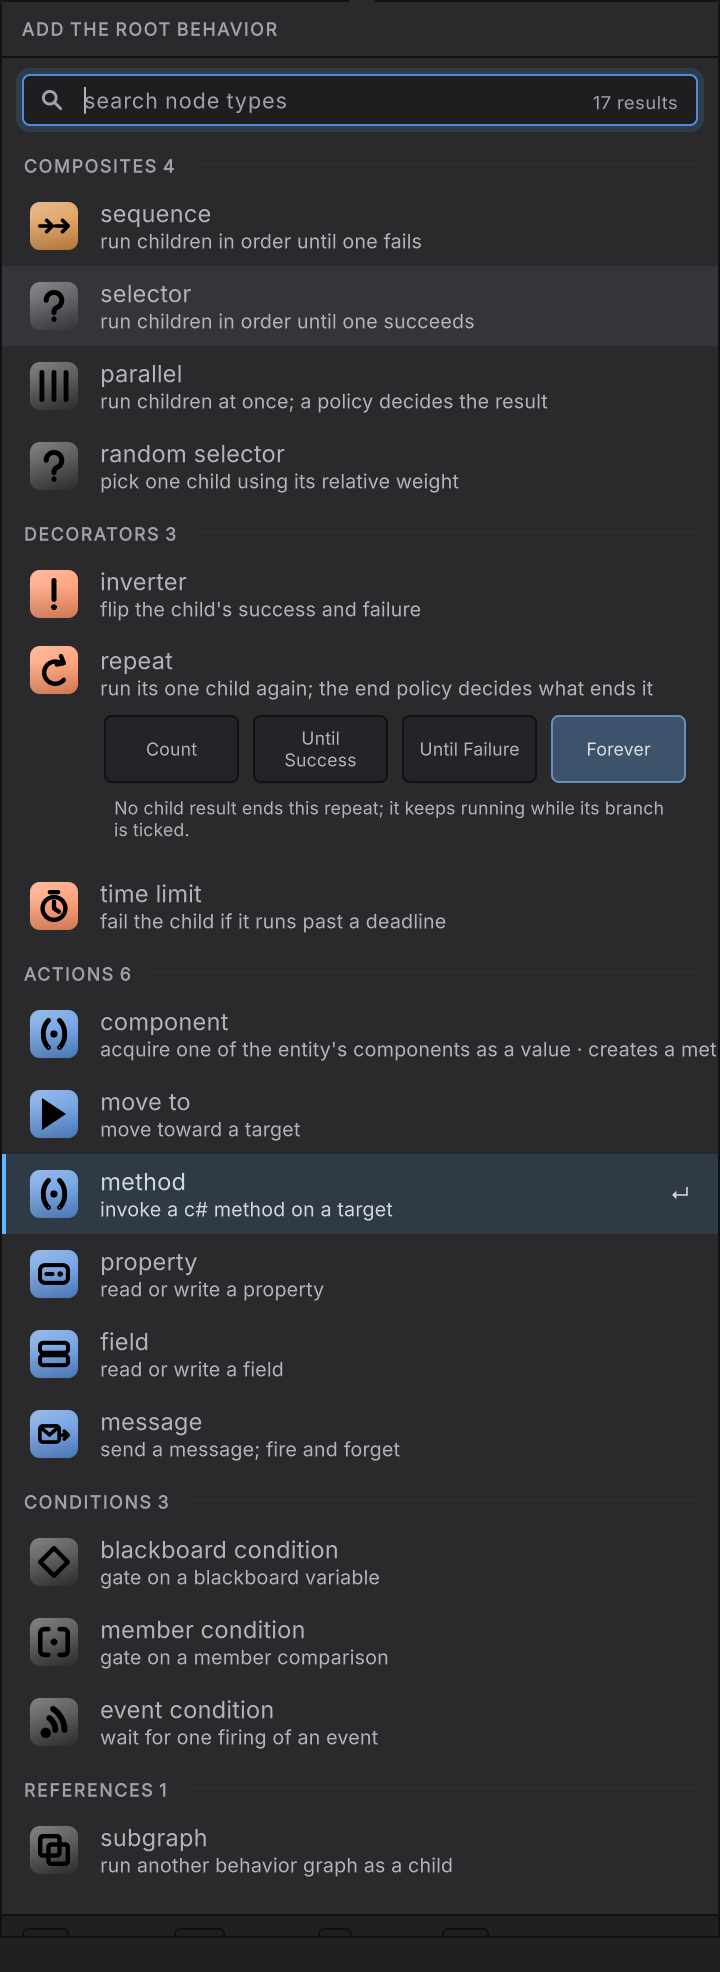
-
Select the new node. In the right rail’s Target card, leave Mode on Agent and Resolve on Self, then choose
GuardMotorin the Component row. The rail explains the choice: it resolves the component on the agent’s own GameObject. -
In the Member card choose Change, then pick the
Advance(float speed)row. The picker lists exact signatures and offers each overload separately, so read the row before you take it.
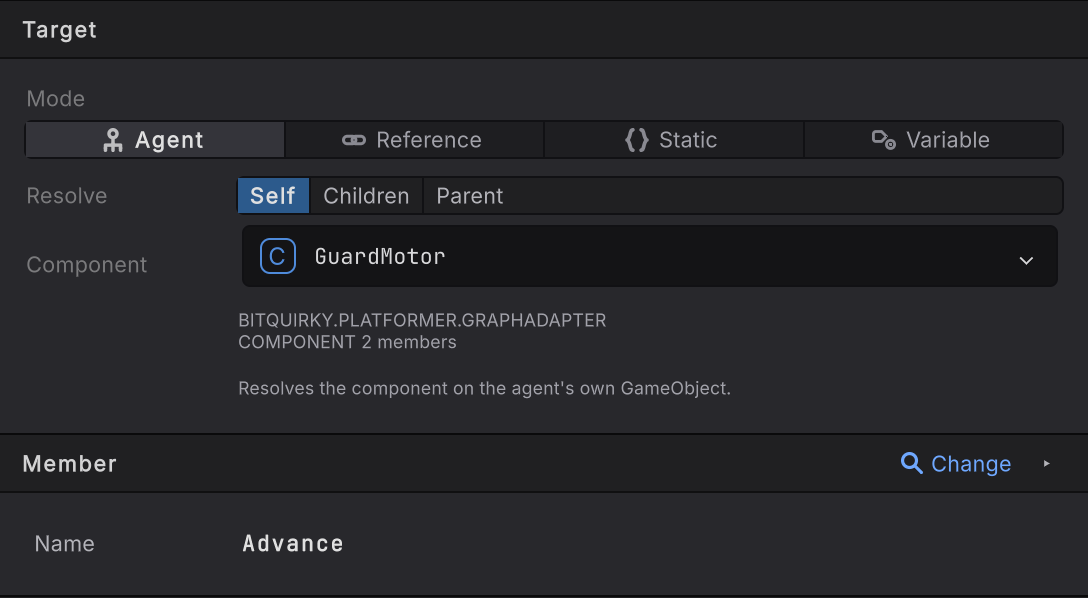
GuardMotor on the agent’s own GameObject, and the Member card holds the exact signature.-
In Arguments, leave
speedon Constant and enter2. -
In Result, set Node result to Test. Choose operator
=, compare against the Boolean Constanttrue, then set When true to running and When false to succeeded. -
Select the node, then click its name on the identity header at the top of the right rail, or press F2, and name it after what it does, such as
advance to the destination. A graph you can read out loud is the point of the exercise, and the Live view names that node when it runs. -
Read the validation state in the toolbar and clear anything it reports. Press Save (Cmd/Ctrl+S): autosave writes the graph file only, and Save imports it and regenerates the member provider. Wait for script compilation to settle.
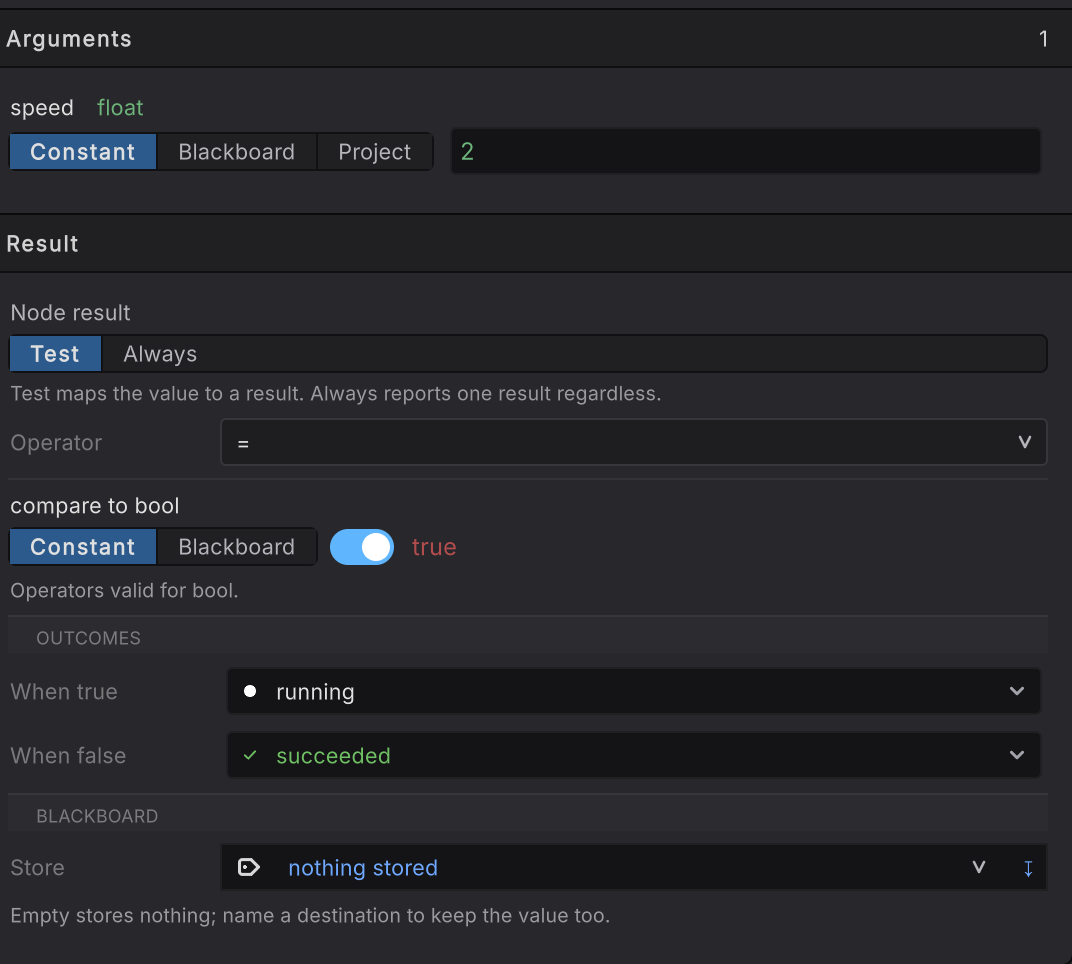
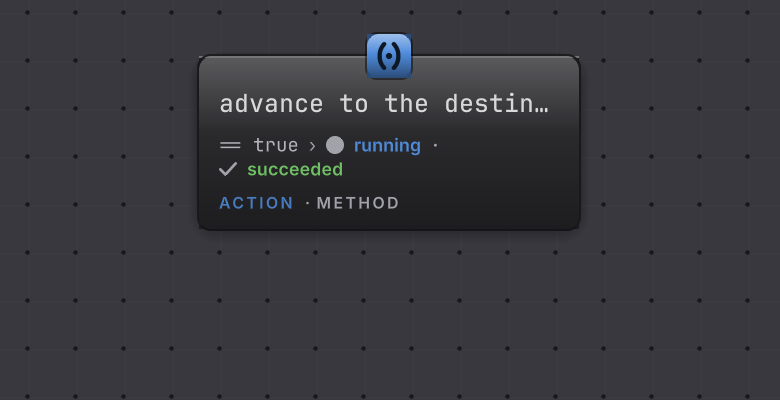
That Result mapping is the whole loop. The rail writes its outcome values the way the editor does, lowercase running and succeeded, while Running, Success and Failure with capitals are the status vocabulary the canvas colors and the Live legend use. While Advance returns true the node stays Running and Unity calls it again on the next agent update. The first false takes the succeeded outcome and the tree is done.
Run it
Section titled “Run it”-
Select Guard and add a Behavior Agent component.
-
Assign
GuardAdvanceto the agent’s Graph field and choose Update for Update Mode. -
Find this graph’s generated provider in the Project window. A graph in
Assembly-CSharpputs it atAssets/BitQuirky/Generated/BehaviorMember/<graph-guid>/BehaviorMemberProvider_<graph-guid>.cs. A graph owned by an assembly definition puts it underGenerated/BehaviorMember/<graph-guid>/beside that.asmdef. -
Drag that provider script onto Guard to add its component, then assign the new component to the agent’s Member Provider Component field. Leave Member References empty, because Agent and Self resolve
GuardMotorfrom the agent’s own GameObject. -
Move Guard far enough from the marker to see the trip, then enter Play Mode.
How it decides
Section titled “How it decides”The Method node owns one call and one mapping from that call’s return value to a graph result.
Result
- Success
- Advance returned false, which the Test mapping sends to the succeeded outcome. The tree finishes.
- Failure
- Nothing here maps to Failure. Set When false to failed instead of succeeded and arrival becomes a failed branch.
- Running
- Advance returned true. The node holds Running and the agent calls the method again on its next update.
A Method node invokes once per evaluation. It does not reinvoke while an earlier call is still outstanding, so a synchronous method like Advance gets exactly one call per agent update.
When it goes wrong
| Symptom | Check | Fix |
|---|---|---|
| GuardMotor is missing from the Component row. | Wait for compilation to finish, then confirm the script and the graph sit in assemblies that can see each other. | Reference the assembly that owns the component, or move the graph beside it. |
| Advance is missing from the member picker. | Confirm the method is public and read its full signature, including overloads. | Make it public, or add a small game facing wrapper and bind that. |
| Validation says an argument is required. | Read the Arguments row for speed. | Give it a typed Constant or a compatible Blackboard value. |
| The agent reports a missing provider. | Look at Member Provider Component on the Behavior Agent. | Attach the provider from this graph's generated folder and assign that exact component. |
| The provider fingerprint is stale. | Confirm the provider you attached came from this graph's GUID folder. | Reimport GuardAdvance, wait for the generated C# to compile, and attach the provider it produced. |
| The node succeeds on the first tick and nothing moves. | Assign Destination, and compare its distance with Stop Distance. | Place the destination further away than Stop Distance. |
| The node finishes while the cube should still be walking. | Read When true and When false against what your method really returns. | Map the keep going value to Running and the finished value to Succeeded. |
| The cube moves at double speed. | Search for a second Behavior Agent on the object and for the old call site in your code. | Remove the retired path so the graph is the only caller. |
- Your first state machine: give this object modes and watch the handoff.
- Your first binding: a property, an event, and a message on the same component.
- Method node reference: every control on the rail you just filled in.